






Tile Levelling System: How It Works, Benefits and Buying Guide
Laying tiles can be hard work, especially when you want a smooth and even floor. However, the right tools can make the job much easier. A tile levelling system helps keep nearby tiles at a similar height while the adhesive sets. As a result, it can help reduce uneven edges and create a neat finish.
Whether you are a DIY enthusiast or a professional tiler, choosing suitable tile levelling products can save time and improve your results. In addition, the right equipment helps you space tiles evenly and work with greater confidence.
What Is a Tile Levelling System?
A tile levelling system is a set of tools that helps keep tiles level during installation. Most systems use clips or spacers and tightening caps, wedges or screws. These parts hold the tiles in position while the adhesive begins to set.
Unlike basic spacers, which mainly keep gaps even, levelling products also help reduce differences in height between neighbouring tiles. Therefore, they are useful for many floor tiling projects.
You can explore the tile levelling system range to find products for your next tiling job.
How Is a Tile Levelling System Made?
Most systems use durable plastic parts designed for repeated handling during installation. However, the exact materials and design depend on the product.
The main parts usually include:
- Base spacers: These sit between tiles and help maintain a consistent gap.
- Twister screws or caps: These tighten to hold neighbouring tiles at a similar height.
- Breakaway sections: Some systems use a narrow base that breaks away after the adhesive has set.
Manufacturers shape the plastic parts to provide a secure fit and simple handling. In addition, the design must suit the intended tile thickness and joint width.
Before you start, check that your chosen parts are compatible with your tiles and the installation method.
How Does a Tile Levelling System Work?
A tile levelling system works by holding the edges of nearby tiles in line while the adhesive sets. First, spread the correct tile adhesive across the prepared surface. Next, place the tiles and insert the levelling spacers between them.
Then, fit and tighten the matching caps or screws. This action helps reduce height differences between neighbouring tiles. However, avoid overtightening, as too much pressure may move the tiles or affect the adhesive bed.
Once the adhesive has set for the time stated by its manufacturer, remove the levelling parts as directed. Finally, clean the joints and apply grout when suitable.
For the best results, follow the adhesive instructions and keep the tiles correctly supported throughout installation.
Tile Levelling Spacers and Their Advantages
Tile levelling spacers help maintain even joints while reducing lippage. Lippage occurs when one tile sits higher than the tile beside it.
These spacers offer several benefits:
- More even results: They help keep tile edges aligned.
- Consistent gaps: They support neat grout lines across the floor.
- Less adjustment: They can reduce the need for repeated manual corrections.
- Better workflow: They help tilers position several tiles with greater confidence.
- A cleaner finish: They can improve the appearance of tiled floors when used correctly.
However, spacers cannot correct a badly prepared base or an uneven adhesive bed. Therefore, always prepare the floor properly before fitting tiles.
What Are Tile Spacers Used For?
Tile spacers are small parts that help maintain a set gap between tiles. This gap allows room for grout and helps create a consistent pattern.
Basic spacers suit many wall and floor projects. Meanwhile, levelling versions also help control differences in tile height.
When choosing a spacer, consider the tile size, joint width and installation requirements. You should also check whether the product suits ceramic, porcelain or other tile types.
A spacer is designed to maintain separation between objects. In tiling, this simple function helps create neat and even joints.
Why Use Floor Tile Spacers?
Floor tile spacers are useful when laying tiles in kitchens, bathrooms, hallways and other suitable areas. They help keep the spacing consistent across large surfaces.
Moreover, correct spacing makes grouting easier and supports a tidy finish. For large-format tiles, a suitable levelling system can also help reduce uneven edges.
However, you must choose products that match the tile thickness and joint size. Always check the product instructions before starting work.
Recommended Product
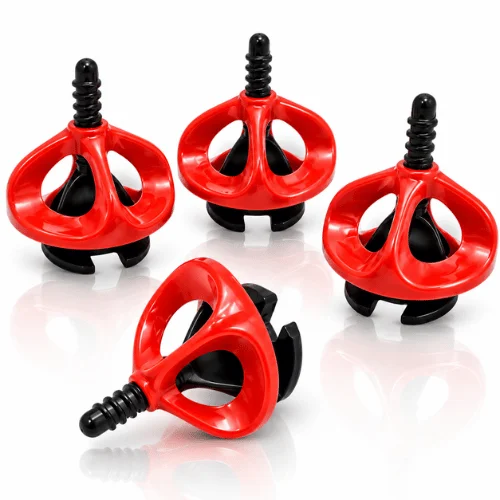
Tile Spacer Levelling System 2mm Floor Twister Spacer Screws + Red Twister Nuts
The Tile Spacer Levelling System 2mm Floor Twister Spacer Screws + Red Twister Nuts is an option to consider for floor tiling projects that require 2mm joints.
This product combines spacer screws with red twister nuts to help keep neighbouring tiles aligned during installation. The twisting action lets you tighten the system around the tile edges.
Key points to consider:
- Designed for a 2mm tile joint.
- Helps maintain consistent spacing.
- Supports alignment between neighbouring tiles.
- Useful for suitable DIY and professional flooring jobs.
- Requires correct fitting and removal according to the product instructions.
You can view the Tile Spacer Levelling System 2mm Floor Twister Spacer Screws + Red Twister Nuts at TradeBoxDirect to check the product details before ordering.
What Other Tiling Tools Do You Need?
Along with levelling products, you may need several other tiling tools to complete the job.
These may include a tile cutter, notched trowel, tape measure, spirit level, grout float and cleaning sponge. Each tool serves a different purpose. For example, a notched trowel spreads adhesive, while a tile cutter helps you shape tiles to fit around corners and edges.
You should also check the edge of each tile for chips before installation. In addition, choose a suitable adhesive for the tile type and base.
A suitable tile levelling system can work alongside these tools to support an accurate finish.
How to Choose the Right Tile Levelling System
Before shopping for tiling supplies, consider these key points.
1. Joint width: Choose the correct size for your planned grout lines. A 2mm option suits projects where that joint width is appropriate.
2. Tile thickness: Check the product’s supported thickness range. The system must fit securely around your tiles.
3. Tile material: Some tiles are heavier or more delicate than others. Choose a system that suits the material and follow the handling instructions.
4. Ease of use: Twister nuts and screw-based designs may be convenient for users who prefer a simple tightening method.
5. Product compatibility: Make sure the components are compatible with one another and with your tiles.
6. Project size: Estimate how many tiles you will lay and how many levelling parts you may need. This helps you plan your shopping list and avoid delays.
You should also consider the room’s temperature and the adhesive manufacturer’s setting instructions. Check the recommended frequency of any required installation checks, and use suitable control over tightening pressure to avoid moving the tiles.
Where Can You Buy a Tile Levelling System?
Buying the right supplies from a dedicated flooring and tiling category makes it easier to compare products before starting work.
At TradeBoxDirect, you can browse tile levelling system products and flooring supplies for your next project.
Before you order, check the joint size, product contents and installation instructions. Also, review how the system should be removed after the adhesive sets. These simple steps can help you select the right equipment for your needs.
Frequently Asked Questions
1. What is a tile levelling system used for?
It helps keep neighbouring tiles at a similar height and maintains even gaps while the adhesive sets. It can reduce lippage and improve the finished appearance.
2. Are tile levelling spacers better than standard spacers?
They serve slightly different purposes. Standard spacers mainly maintain joint width, while levelling spacers also help align tile heights. The best option depends on your project.
3. Can beginners use a tile levelling system?
Yes. Many systems are suitable for DIY users. However, beginners should read the instructions, prepare the base carefully and practise tightening the parts without moving the tiles.
4. When should I remove the levelling parts?
Remove them only after the adhesive has set enough, as directed by the adhesive and levelling system manufacturers. Removing them too early may disturb the tiles.
5. Can a levelling system fix an uneven floor?
No. It helps align tiles, but it cannot replace proper floor preparation. You should correct major uneven areas before applying adhesive.
6. Why choose a 2mm tile spacer levelling system?
A 2mm system helps maintain 2mm joints where that width suits the tile and installation plan. Always check the tile manufacturer’s guidance before choosing the joint size.
Conclusion
A tile levelling system is a useful addition to many floor tiling projects. It helps maintain even joints, reduces differences in tile height and supports a neat finish. Furthermore, the right combination of spacers, screws and other tiling tools can make installation easier for both DIY users and professionals.
Before you buy, check the joint width, tile thickness and product instructions. With careful preparation and suitable equipment, you can achieve a more even, professional-looking tiled floor.