






How Do You Make Sure Tiles Are Levelled?
Introduction
Installing tiles looks simple, but getting every tile leveling system to the same height can take care and patience. Even a small difference between two tiles can create an uneven surface. This problem is often called tile lippage. It can affect both the look and feel of a finished floor or wall.
Fortunately, there are several ways to keep tiles level. Good surface preparation, the right adhesive, careful placement, and suitable tools all play an important role. In addition, a tile leveling system can make it easier to keep nearby tiles at a similar height while the adhesive dries.
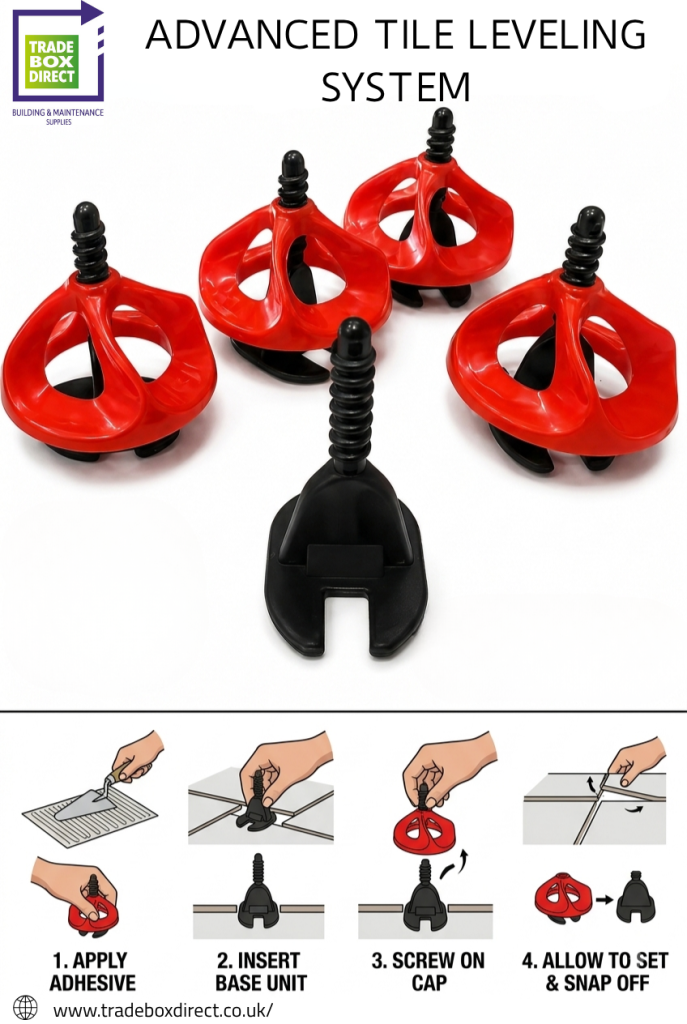
One useful option for floor projects is the Tile Spacer Levelling System 2mm Floor Twister Spacer Screws + Red Twister Nuts. This type of system combines spacing and levelling in one setup. It can help maintain a consistent 2 mm joint while the twister parts apply pressure to the tile edges.
This guide explains how to make sure tiles are level, how levelling systems work, what tools you need, and how to avoid common mistakes.
Why Is Tile Levelling Important?
A level tile surface looks cleaner and feels better underfoot. When tiles sit at different heights, one edge may stick up above another. This can create a trip point and may also make cleaning harder.
Uneven tiles can also affect the grout lines. If the tiles move during installation, the gaps may become inconsistent. As a result, the finished surface may look untidy.
Therefore, levelling should be considered from the start of the project. It is much easier to prevent uneven tiles than to correct them after the adhesive has dried.
Start With a Flat Surface
The first step is to prepare the surface properly. A tile leveling system can help align tiles, but it cannot repair a badly uneven floor.
Begin by removing dust, dirt, loose material, and old adhesive. Next, check the surface with a long spirit level or straight edge.
Look for dips, bumps, cracks, or loose areas. Small imperfections may be corrected with a suitable preparation product. Larger problems may need more work before tiling starts.
A flat base gives the tiles a better starting point. Therefore, spend enough time on preparation before opening the adhesive.
Use the Right Tile Adhesive
The adhesive also affects tile height. If one part of a tile has more adhesive than another, the tile may sit unevenly.
Choose an adhesive that suits the tile type and surface. For example, porcelain tiles may need an adhesive designed for porcelain. Always follow the manufacturer’s instructions.
Mix the adhesive correctly. Too much water can weaken it, while an overly dry mix may not spread properly.
Use the correct notched trowel. The notches help create an even adhesive bed. For larger tiles, the installation method may also require adhesive to be applied to the back of the tile.
Good adhesive coverage helps support the tile across its surface. As a result, the tile is less likely to move or sink unevenly.
Plan the Tile Layout First
Before applying adhesive, plan where the tiles will go. Measure the room and mark useful reference lines.
Start from a suitable point rather than simply beginning at the nearest wall. Walls are not always perfectly straight. If you use a crooked wall as your guide, the tile pattern may gradually move out of line.
Dry-lay a few tiles if needed. This gives you a chance to check the layout and decide where cuts will be placed.
Planning also helps reduce waste. More importantly, it gives you a clear guide before the adhesive is spread.
Use Tile Spacers for Consistent Gaps
Tile spacers are small pieces that help maintain an even gap between tiles. They come in different sizes, such as 2 mm, 3 mm, and 5 mm.
The correct size depends on the tile and the design you want. A consistent gap is important because the grout lines will follow it.
However, normal spacers mainly control the gap. They do not always prevent one tile from sitting higher than the next.
That is why many installers combine spacers with a levelling method.
Tile Leveling Spacers for Better Alignment
Tile leveling spacers combine spacing with extra support. They can help maintain the required joint while also reducing small height differences.
The 2 mm floor twister system mentioned above is designed for a 2 mm joint. Its spacer component keeps the tiles apart, while the screw and nut arrangement helps bring the tile edges into alignment.
This can be useful when installing floor tiles where a clean and even finish is important.
Before use, check the product’s recommended tile thickness and installation instructions. Compatibility matters because not every system suits every tile.
How the Tile Spacer Levelling System Works
The Tile Spacer Levelling System 2mm Floor Twister Spacer Screws + Red Twister Nuts uses a simple twisting action.
First, the spacer is positioned between two tiles. The tiles are placed at the correct distance from each other. Next, the twister screw is positioned through the spacer.
The red twister nut is then turned by hand. As it tightens, it applies pressure to the tile edges. This helps bring the nearby tiles to a similar height.
The system remains in place while the adhesive sets. Once the adhesive has cured, the levelling components can be removed according to the product instructions.
This method provides both spacing and levelling support. Therefore, it can reduce the need to use separate components for each task.
Check Each Tile as You Work
Do not wait until the entire floor is finished before checking the level. Check tiles as you install them.
Place a spirit level across two or more tiles. Look for gaps beneath the level. Then check from another direction.
You can also use a straight edge across several tiles. This can reveal height differences that may not be obvious when looking at one tile.
If a tile is too high, adjust it while the adhesive is still workable. Once the adhesive has cured, corrections become much harder.
Use the Correct Pressure
When using a tile leveling system, pressure should be applied carefully.
Too little pressure may not hold the tiles in alignment. On the other hand, too much pressure can move the tiles or push too much adhesive away from the contact area.
The goal is not to force the tiles into position. Instead, use steady and controlled pressure.
With a twister-style system, turn the nut gradually. Check the tile surface as you tighten it. Stop when the edges are aligned and the tiles are secure.
Floor Tile Spacers and Their Role
Floor tile spacers are especially useful when creating a regular floor pattern. They help maintain the joint width across the installation.
For example, a 2 mm spacer can create a narrow and neat grout line. However, the correct joint depends on the tile type and manufacturer’s guidance.
Floor spacers can be used with a levelling system when the products are designed to work together. In the case of a twister system, the spacing element forms part of the levelling setup.
Keep checking the joint as you move across the room. Small spacing changes can become obvious near walls and doorways.
Choose the Right Tiling Tools
Good tiling tools can make the installation much easier. You do not need every tool available, but a few basic items are very useful.
Common tools include:
- Spirit level
- Straight edge
- Measuring tape
- Notched trowel
- Tile cutter
- Tile nippers
- Rubber mallet
- Mixing bucket
- Grout float
- Cleaning sponge
- Tile spacers
- Levelling components
- Safety gloves
Each tool has a different purpose. A spirit level checks alignment, while a notched trowel helps spread adhesive. A tile cutter creates clean cuts, and a rubber mallet can help with gentle positioning.
Having the right equipment ready before starting can save time.
Use a Tile Levelling System on Large Tiles
Large tiles can be harder to level by hand. Their size means that even small surface variations can become visible.
A tile leveling system can provide extra support along the tile edges. This can be helpful when installing large porcelain or ceramic floor tiles.
However, large tiles also require careful adhesive coverage. Follow the tile manufacturer’s recommendations for adhesive application.
Do not use the levelling system to force a large tile onto an uneven base. Correct the surface first.
Tile Levelling System for Wall Tiles
A tile levelling system can also be useful for some wall-tile projects. Wall tiles can move before the adhesive sets, especially when they are large or heavy.
A suitable levelling system can help hold neighbouring tiles in alignment. Still, wall preparation is very important.
Make sure the wall is clean, stable, and suitable for the chosen adhesive. Follow the manufacturer’s instructions for the tile and adhesive.
When working on walls, check the level frequently. Gravity can slowly affect tile position, so early correction is much easier than later repair.
Common Problems That Cause Uneven Tiles
Several mistakes can lead to uneven tiles.
Uneven Base
A poor base is one of the biggest causes. Always check the surface before tiling.
Uneven Adhesive
If adhesive is spread at different depths, the tiles may sit at different heights.
Poor Tile Placement
Moving a tile too much after placing it can disturb the adhesive bed.
Wrong Spacer Size
Using the wrong spacer can change the grout joint and affect the tile pattern.
Too Much Pressure
Over-tightening a levelling component can push tiles out of position.
Working Too Fast
Rushing can lead to missed checks and poor alignment. Work at a steady pace instead.
How to Remove the Levelling Parts
Removal should be done after the adhesive has cured enough.
For the twister system, follow the manufacturer’s removal instructions. Do not remove components while the adhesive is still soft unless the product specifically requires it.
Once removed, inspect the joints. Clean away any adhesive that has entered the grout space.
Never strike the tile surface directly with a hard tool. If a breakaway part needs to be tapped, use the recommended method and direction.
How to Get a Professional-Looking Finish
A professional result starts with careful planning. First, prepare the surface. Then check the tile layout and choose the correct adhesive.
Next, use consistent spacing and check tile height as you work. A tile leveling system can provide extra support, but it should be part of a complete installation method.
Keep your work area clean. Remove excess adhesive before it hardens. Check each section before moving on.
Finally, allow enough curing time before walking on the floor or applying grout. The adhesive manufacturer’s instructions should always be followed.
Frequently Asked Questions
1. How can I tell if my tiles are level?
Use a spirit level or straight edge across two or more tiles. Check from different directions to identify height differences.
2. Can tile spacers level tiles?
Standard spacers mainly control the gap. They do not always control tile height. A levelling system provides additional support.
3. Is a 2 mm tile spacer suitable for every floor?
No. The correct joint depends on the tile and installation requirements. Check the tile manufacturer’s recommendations before choosing a spacer.
4. Is the Tile Spacer Levelling System suitable for DIY projects?
A twister-style system can be useful for DIY users because it provides a simple way to maintain spacing and alignment. Always read the product instructions before use.
5. Can a levelling system fix a very uneven floor?
No. It can help align neighbouring tiles, but it cannot replace proper floor preparation.
Final Thoughts
Making sure tiles are level requires more than simply placing them on adhesive. The surface must be prepared, the layout should be planned, and the correct adhesive and tools should be used.
A tile leveling system adds useful support by helping keep nearby tile edges at a similar height. The Tile Spacer Levelling System 2mm Floor Twister Spacer Screws + Red Twister Nuts also combines spacing and levelling, making it a practical option for suitable floor-tile projects.
Use tile leveling spacers when you need better control over tile height and joint spacing. Combine them with suitable tile spacers, floor tile spacers, and quality tiling tools for a smoother installation.
Most importantly, work slowly and check your tiles as you go. With good preparation, careful spacing, and the right levelling method, you can create a clean, even, and attractive tiled surface.